Popular Posts

Dec 29, 2010

Login Script (Rebember Me)


To make a login system with remember me option follow the steps and try to understand the code...

step1: Make a database and a table.
DROP DATABASE loginDB;
CREATE DATABASE loginDB;
USE loginDB;
CREATE TABLE tbl_Login(
id int(2) NOT NULL AUTO_INCREMENT,
email varchar(45) NOT NULL,
password varchar(45) NOT NULL,
primary key (id)
);
insert into tbl_Login (email,password) VALUES ('jubayer1',SHA('123456'));

step2: Create a file named it config.php then type the code.This file the database connection.

<?php
$connect = mysql_connect('localhost','root','1111111111') or die(mysql_error());
$selectDB = mysql_select_db('loginDB') or die(mysql_error());
?>

step3: Create a file named it login.php.
<?
require_once('config.php');
session_start();
$msg = "";
if(isset($_POST['posted'])){
$email = mysql_escape_string(trim($_POST['email']));
$password = mysql_escape_string(trim($_POST['password']));
if(!empty($email) && !empty($password)){
$getInfo = "SELECT * FROM tbl_Login WHERE email='$email' AND password=SHA('$password')";
$result = mysql_query($getInfo) or die(mysql_error());
if(mysql_num_rows($result)==1){
while($rows = mysql_fetch_array($result)){
$_SESSION['email'] = $rows['email'];
$_SESSION['password'] = $rows['password'];
if(isset($_POST['rebember'])){
setcookie('email', $rows['email'], time() + (60 * 60 * 24 * 7));    // expires in 7 days
setcookie('password', $rows['password'], time() + (60 * 60 * 24 * 7));  // expires in 7 days
}
$home = "logged_user.php";
header ('Location:'.$home);
}
}else{
 $msg = "Not found in the database...";
}
}else{
 $msg = "Empty password/email";
}
}
?>
<html>
<head>
<title>Login</title>
</head>
<body>
<table width="50%">
<tr><td>
<fieldset><legend>Login</legend>
<? echo $msg; ?>
<form name="loginFrm" action="<? echo $_SERVER['PHP_SELF']; ?>" method="post">
<label>Email</label>&nbsp;<input type="text" name="email" /><br /><br />
<label>Password</label>&nbsp;<input type="password" name="password" /><br />
<input type="hidden" name="posted" value="true" />
<label><input type="checkbox" name="rebember" value="true" /></label>&nbsp;<label>Rebember me for seven days</label><br />
<input type="reset" name="reset" value="Reset" />&nbsp;<input type="submit" name="submit" value="Login" /><br />
</form>
<label><a href="#"><label>Forgot password</label></a>
</fieldset>
</td>
</tr>
</table>
</body>
</html>


step4: Create a file named it auth_user.php

<?php
session_start();
if($_SESSION['email'] == "" && $_SESSION['password']==""){
$url = 'login.php';
header('Location:'.$url);
}
?>

step5: Create a file named it logOut.php

<?php
session_start();
session_unset();
session_destroy();
if(isset($_COOKIE['email']) && isset($_COOKIE['password'])){
   setcookie("email", "", time()-60*60*24*100, "/");
   setcookie("password", "", time()-60*60*24*100, "/");
}
if($_SESSION['email'] !="" && $_SESSION['password'] !=""){
$url = 'login.php';
header('Location:'.$url);
}else{
$url = 'login.php';
header('Location:'.$url);
}
?>

step6: Create a file named it logged_user.php

<?
session_start();
include 'auth_user.php';
$user = $_SESSION[email];
echo '<br>';
?>
&nbsp;&nbsp;&nbsp;&nbsp;<p align="right"><a href="logOut.php">logOut</a></p>
<h1>Hello [<?=$user;?>]</h1>
<hr />

Master Page

You can use master pages like a template.If you have many web pages and if you don't want to change the layout  master page is the easy solution.

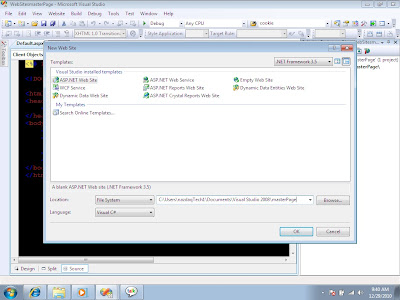
Step1: Create a new Project


step2: Create a Masterpage from add new item.


step3: Change the background color from properties.


step4: Add new webform from add new item.rename to page1.aspx and select the masterpage.Then click the
add button.If you have more then one master page in that case you have to choose the masterpage.


 step4: Click on the page1 and go to the design view.Type something on contentPlaceHolder1.


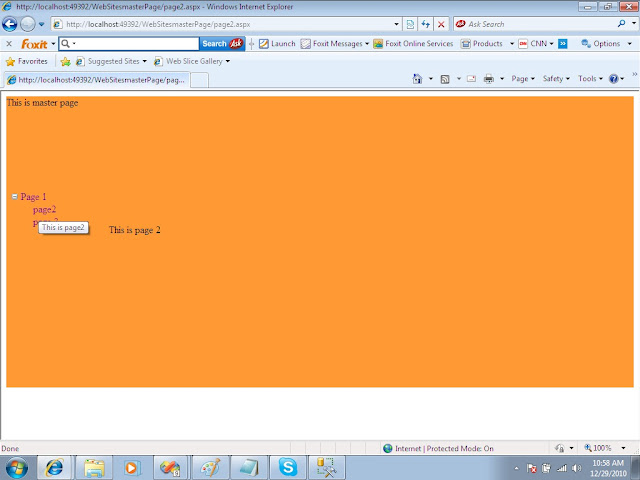
Step5:Open Masterpage add a table(3rows and 3columns).place the contentPlaceHolder to the mid cell.


step6:Add sitemap from add new item.Give the link of your pages.


step7: Add TreeView From Navigation.


step8: Choose new datasource then select sitemap.


step9: select page1 as start page then run the project.


step10: You can also use Menu from Navigation.Then choose the datasource.


step11: Run the project.

Dec 13, 2010

Crystral Report

To making Crystal Report i continue from my previous post. So you have to follow from my previous post.


Step1: Add a button on the windows form.We add the button in FirstUI.cs.Then rename the button as crystalButton.
Step2: Add a new Windows Form and named it CrystalUI.
Step3: Add CrystalReportViewer from Toolbox to the form CrystalUI.
Step4: Rename the CrystalReportViewer to studentCrystalReportViewer.
Step5:Add new CrystalReport and named it StudentCrystalReport.


Step6: Select As a blank Report and then click ok.
Step7: Add these code to CrystalUI.cs
StudentBLL studentBLLObj = null;
        public CrystalUI()
        {
            studentBLLObj = new StudentBLL();
            InitializeComponent();
            StudentCrystalReport reportObj = new StudentCrystalReport();
            reportObj.SetDataSource(studentBLLObj.GetStudentInfo());
            studentCrystalReportViewer.ReportSource = reportObj;

        }

Step8:Double click on StudentCrystalReport.rpt


Step9:Select database field and then right click on database expert.


Step10: After select the field from the database experts.


Step11: Double click on the button crystalButton which is in the FirstUI.cs

Then write these code so the when you click on the button the crystal report window can open….


        private void crystalButton_Click(object sender, EventArgs e)
        {
            CrystalUI crystalObj = new CrystalUI();
            crystalObj.Show();
        }

Step12:Run the project and then click on the Make Report button.You will see the crystal Report like this.


Dec 12, 2010

Using List View (C#)

How to show data in list view using Layer Architecture and OOP Approach.To day i am making this for my blog with easy steps.

Step1: Open a new project.


Step2: Make a project i named it ShowData.


Step3: Delete From1.cs and Program.cs files

Step4: Add a new Class named it EntryPoint.cs

Step5: Add a new folder named it UI and add new windows form named it FirstUI.cs from add new item

Step6: Add more folder and named it as DAL, BLL, Database

Step7:Now go to your EntryPoint.cs and add this code

public static void Main(string[] args)
       {
           Application.Run(new FirstUI());
       }

Step8: Add one more folder to DAL (Data Access Layer) And named it DAO(Data Access Object)

Step9: Add a class and named it as Student.cs


Step10: Type the variable and encapsulate them. 


After encapsulating all fields your code will look like this:

public class Student
    {
        private string name;

        public string Name
        {
            get { return name; }
            set { name = value; }
        }
        private string rollNo;

        public string RollNo
        {
            get { return rollNo; }
            set { rollNo = value; }
        }
        private string gpa;

        public string Gpa
        {
            get { return gpa; }
            set { gpa = value; }
        }
        private string dept;

        public string Dept
        {
            get { return dept; }
            set { dept = value; }
        }
        private string reg;

        public string Reg
        {
            get { return reg; }
            set { reg = value; }
        }

    }


Step11:Add new class to Database folder and named it DBConnection.cs
Step12:Now i connect to the SQLServer.Your code might be like this:
    public class DBConnection
    {
       private SqlConnection sqlConn = null;
        private string connectionString = null;
        public DBConnection()
        {
            try
            {
                connectionString = @"server=localhost\SQLEXPRESS; Integrated Security=SSPI; database=ViperStudentDB";
                sqlConn = new SqlConnection(connectionString);

            }
            catch (IOException ioObj)
            {
                throw ioObj;
            }
        }

        public SqlConnection GetConnection
        {
            get
            {
                return sqlConn;
            }

        }
    }

Step13:Now i add another new class called MethodStudent.cs to Database folder;


Step14: Now we add a method that will select all the student of the database.

public class MethodStudent
    {
        DBConnection dbConnectionObj = null;
        public List<Student> GetStudentInfo()
        {
            List<Student> studentListObj = new List<Student>();
            string sqlString = "SELECT * FROM t_studentInfo";
            SqlConnection sqlConn = dbConnectionObj.GetConnection;
            sqlConn.Open();
            SqlCommand comObj = new SqlCommand(sqlString,sqlConn);
            SqlDataReader readerObj = comObj.ExecuteReader();
            while (readerObj.Read())
            {
                Student studentObj = new Student();
                studentObj.Name = readerObj[0].ToString();
                studentObj.RollNo = readerObj[1].ToString();
                studentObj.Gpa = readerObj[2].ToString();
                studentObj.Dept = readerObj[3].ToString();
                studentObj.Reg = readerObj[4].ToString();
                studentListObj.Add(studentObj);
            }
            sqlConn.Close();
            return studentListObj;
        }
    }

Step15:Add one more class to the BLL(Business Logic Layer) folder.To add new class right click and select new item.
Type the code

   public class StudentBLL
    {
       public List<Student> GetStudentInfo()
       {
           MethodStudent metodObj = new MethodStudent();
           return metodObj.GetStudentInfo();
       }
    }

Step16:Add a listView and a button to the windows Form.and named them as studentListView and the button will be studentButton.

Step17:Select your listView and go to the propertyes and made some changes.You can add column header following the steps.

Click on the corner of the listview,click on edit columns, click on add button.


Step18:Now double click on the button and type the code so that you can see the data to the listView.


  StudentBLL studentBllObj = null;
        public FirstUI()
        {
            studentBllObj = new StudentBLL();
            InitializeComponent();
        }

        private void studentButton_Click(object sender, EventArgs e)
        {
            foreach (Student studentObj in studentBllObj.GetStudentInfo())
            {
                ListViewItem listViewObj = new ListViewItem(studentObj.Name);
                listViewObj.SubItems.Add(studentObj.RollNo);
                listViewObj.SubItems.Add(studentObj.Gpa);
                listViewObj.SubItems.Add(studentObj.Dept);
                listViewObj.SubItems.Add(studentObj.Reg);
                studnetListView.Items.Add(listViewObj);
            }

        }


Step20:Now run the project and click on the button you can see the result:

Dec 5, 2010

Abstract

Abstract classes are classes that contain one or more abstract methods. An abstract method is a method that is declared, but contains no implementation. Abstract classes may not be instantiated, and require subclasses to provide implementations for the abstract methods. Let's look at an example of an abstract class, and an abstract method.
Suppose we were modeling the behavior of animals, by creating a class hierachy that started with a base class called Animal. Animals are capable of doing different things like flying, digging and walking, but there are some common operations as well like eating and sleeping. Some common operations are performed by all animals, but in a different way as well. When an operation is performed in a different way, it is a good candidate for an abstract method (forcing subclasses to provide a custom implementation). Let's look at a very primitive Animal base class, which defines an abstract method for making a sound (such as a dog barking, a cow mooing, or a pig oinking).
public abstract Animal
{
   public void eat(Food food)
   {
        // do something with food.... 
   }

   public void sleep(int hours)
   {
        try
 {
  // 1000 milliseconds * 60 seconds * 60 minutes * hours
  Thread.sleep ( 1000 * 60 * 60 * hours);
 }
 catch (InterruptedException ie) { /* ignore */ } 
   }

   public abstract void makeNoise();
}
Note that the abstract keyword is used to denote both an abstract method, and an abstract class. Now, any animal that wants to be instantiated (like a dog or cow) must implement the makeNoise method - otherwise it is impossible to create an instance of that class. Let's look at a Dog and Cow subclass that extends the Animal class.
public Dog extends Animal
{
   public void makeNoise() { System.out.println 
("Bark! Bark!"); }
}

public Cow extends Animal
{
   public void makeNoise() { System.out.println 
("Moo! Moo!"); }
}
Now you may be wondering why not declare an abstract class as an interface, and have the Dog and Cow implement the interface. Sure you could - but you'd also need to implement the eat and sleep methods. By using abstract classes, you can inherit the implementation of other (non-abstract) methods. You can't do that with interfaces - an interface cannot provide any method implementations.